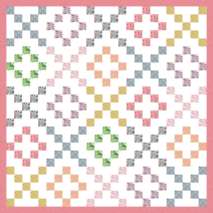
Introduction
Hugs and Kisses is an adorable quilt pattern designed specifically to use in accordance with 1930's Reproduction Fabrics. This charmer will welcome any new baby into the world. Great as a scrappy quilt using a different fabric for each of the 25 X's and 24 O's. And as always, the pattern is free from quiltpox.com
Block Structures
There are 2 different blocks used in this quilt. You will note that each are made up of the same 3 segment units:
These units make up the X (kisses) block:
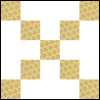 |
And the O (hugs) block:
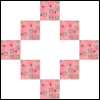 |
I think it is pretty clear how to arrange the A, B, and C units to form the X and O blocks, so, we will discuss how to create the A, B, and C units only.
Fabric Quantities and Cutting Information
The ideal Hugs and Kisses quilt will have many different fabrics in it. Swapping 2.5" strips or fat-quarters of 1930's reproduction prints would be a great way to build up a stash for one or two of these quilts. (Please note, if you chose to add borders, I would, you might want to consider purchasing yardage for that to make it easier.)
Fat Quarters
You will need 1 - 2.5" x 20" strip of fabric for each O block and 1 - 2.5" x 22.5" strip for each X block. Thus, if using fat-quarters, you will need 25 different fat-quarters, or fat-eighths. Now, you may not have access to that many different versions, but, I would suggest that you purchase 10 fat-quarters.
I will provide yardage instructions as if you were using all one fabric for the X and O blocks.
| Fabric | Quantity | Cutting Instructions | Comments |
|---|
| 1930's Reproduction | A total of 3/4 yard for the X blocks
and 3/4 yard for the O blocks | 117 - 2.5"
squares for the X's
96 - 2.5" squares for the O blocks. | You will want each X and O to be of the same color, but mix and match for the overall quilt pattern. |
| Background Fabric | 2 yards | 10 strips @ 2.5" - (cut into 150 - 2.5" squares)
5 strips @ 4.50" -
(cut into 74 4.5" x 2.5" rectangles)
3 @ 6.50" - (cut into 38 - 6.5" x 2.5" rectangles) | Strip piecing instructions will come later. Use a WOW, or other natural colored fabric. |
| Border Fabric | 3/4 yard | 8 strips @ 3" | Join strips in pairs using diagonal seam
Then, cut 2 at 50.5" length
and 2 @ 55.5"
(Measure through the vertical middle of your pre-border quilt for correct border length for the 2 side borders, add them, then measure through the horizontal middle of the quilt with side borders to determine correct length for the 2 top borders. Your measurements may be different than mine.) |
| Binding | 1/2 yard | 6 strips @ 3" | |
| Backing Fabric | 2 - 1 3/4 yard peices | | Sew the two panels together along each side. Press seams to one side. Then fold the tube so that the seams lie on top of each other. Make a notch to one of the sides, and then tear the backing down one side. (This will eliminate having the seam down the middle of the backing.) |
| Batting | 1 twin size batting | | |
Quilt Block Assembly
While you could easily strip piece this quilt for faster assembly, I am giving directions for piecing it block-by-block because ideally, you want it somewhat scrappy looking. I would use the same fabric in each block, however. All seams should be 1/4" and pressed towards the reproduction fabric.
"X" Block
Unit A Assembly (Make 2)

- Sew 1 - 2.5" repro square to 1 - 6.5" background strip.
- Sew another 2.5" repro square to the other end of the 6.5" background strip.
- Press seams towards the repro fabric.
Unit B Assembly (Make 2)

- Sew 1 of the 2.5" repro squares to 1 of the 2.5" background squares.
- Repeat Step1.
- Sew 1 - 2.5" background squares to one of the repro units you made above.
- Sew the two units together, joining the background and repro fabric sections.
- Press seams towards the repro fabric.
Unit C Assembly (Make 1)

- Sew 1 - 2.5" repro square to 1 - 4.5" background strip.
- Sew another 4.5" strip to the other side of the repro fabric in the step above.
- Press seams towards the repro fabric.
Following the diagram below, join the rows into the completed block, press all seams in one direction.
"O" Block
Following the instructions above, make 1 Unit A, 2 Unit B's, and 2 Unit C's.
Following the diagram below, join the rows into the completed block, press all seams in one direction.
Block Size
Unfinished Block Size: 10.5" square. (Yours may vary depending on how good your 1/4" seam allowance.)
Quilt Assembly
Following the table below, join the blocks into rows, then join the rows together. As you join the blocks, rotate the O blocks, turn them upside down, so that the seams butt with the seams of the X block.
| X | O | X | O | X |
| O | X | O | X | O |
| X | O | X | O | X |
| O | X | O | X | O |
| X | O | X | O | X |
Now, add your side borders, press towards the border. Add the top, and press towards the border. Trim all excess threads, and press well. Layer your backing, wrong side up, then your batting, then your quilt top. Baste as desired. Quilt as desired. Bind it, and you are all done. If you need more instruction on any of the above, be sure to go to the Beginner's section of this web site.
Quilting Ideas
I would quilt in diagonal lines through the reproduction fabrics, and then either free motion, or hand quilt, a design inside each of the O blocks.
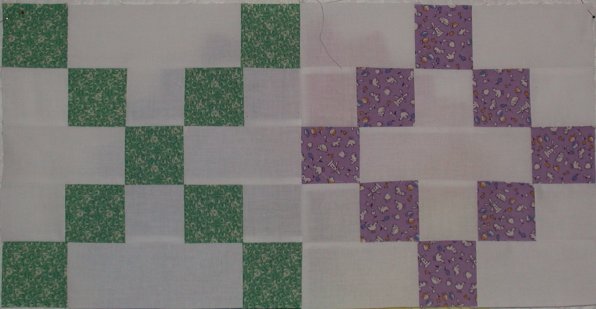
Wanna see some actual, finished blocks? Click Here.
|
