This star has many different names, but I am writing instructions here specifically for a swap I am doing.
Fabric Selection & Cutting Instructions
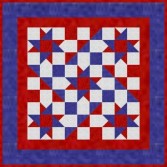
Here are the colors we will be working with today:
| Swatch | Yardage Requirements | Cutting Instructions |
 | 1/2 yard |
3 - 3" x WOF strips (cut into 36 3" x 3" squares)
1 - 4" x WOF strip(cut into 10 4" squares)
|
 | 3/4 yard |
6 - 3.5" x WOF strips:
- Cut 2 - 3.5" x 27" strips (for border)
- Cut 2 - 3.5" x 33" strips (for border)
- Cut the remaining 2 strips into 3.5" x 3.5" squares (this will yield 24)
Cut 4 more squares at 3" from the shorter border strips, and trim down to 3.0" square for the split 9patch block.
- From the remaining navy strip pieces, cut two more 3.5" x 3.5" squares.
|
 | 1 yard |
1 - 4" x WOF strip(cut into 4" squares, you will need 10)
1 - 3.5" x WOF strip (cut 10 @ 3.5" squares)
1 - 3" x WOF strip (cut 9 @ 3" squares)
4 - 3" x WOF strips (for binding)
4 - 2.5" strips (for borders:
Cut 2 @ 23" length and 2 @ 27" length) |
Batting:
1 yard or crib size packaged batting.
Fleece that comes in the 36" width would be good for this project.
Backing:
1 1/4 yard muslin or fabric of your choice.
Cut a 6" x 30" strip for hanging sleeve.
Note:All quantities based on 40" wide fabric, unless otherwise stated.
Making the Half Square Triangles (HSTs)
We will make the white/red HSTs first:
- Using a ruler and pencil, draw a diagonal line, corner to corner, on the WRONG side of the WHITE 4" square.
- Place this square, right sides together, on top of the 4" red square.
- Using the diagonal line as a guide, sew a 1/4" seam on both sides of the line.

- Press both seams, then cut the HSTs apart on the diagonal line.
- Press towards the red side.
- Trim all of the HSTs to 3.5":
Using a ruler with a 45° line, align that line with the diagonal seam, then, use the vertical and horizontal 3.5" markings to square up the HST square.
You should now have 20 red/white HSTs that look like this:

Using the instructions above for HSTs, create 40 HSTs using the (3.5") red/white squares and the (3.5") navy squares. Be sure that the diagonal line of the navy square used in making your navy HST line intersects the seam allowance of the red/white HST square.

Trim these to 3.0". You should have a total of 40 HSTs from this step, however, 20 of them will be mirror images, thus, you will need to set them aside for another project.
Your HSTs should look like this:
 Use the half of your squares that match this HST.* Use the half of your squares that match this HST.* |
 Keep this half for a future project. Keep this half for a future project. |
*You may need to rotate your squares to match this. Ensure that you use only the squares that match the first one in your assembly that follows.
Assembling the Blocks
Square Assembly
Using the following grid, and rotating your HST as indicated, sew your squares into rows. Press the seam allowances away from the center row.
| Row 1 |
|
+ |
 |
+ |
|
| Row 2 |
|
+ |
|
+ |
 |
| Row 3 |
|
+ |
 |
+ |
|
Join the rows, matching up opposing seams, and sew together. Press seams away from center row.
Your completed block:

{Continue}
Go Back to QuiltPox.com