Click on any of the images to see a larger view.
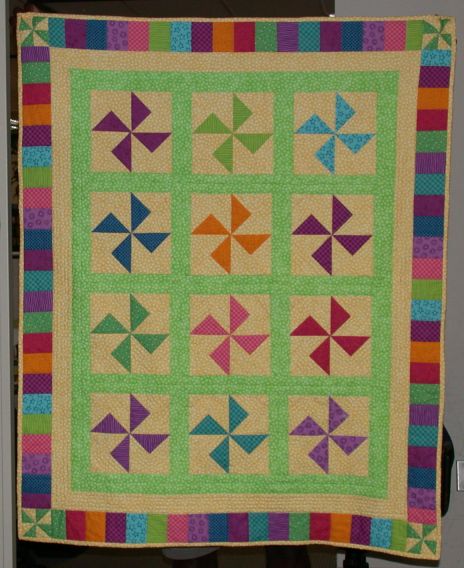 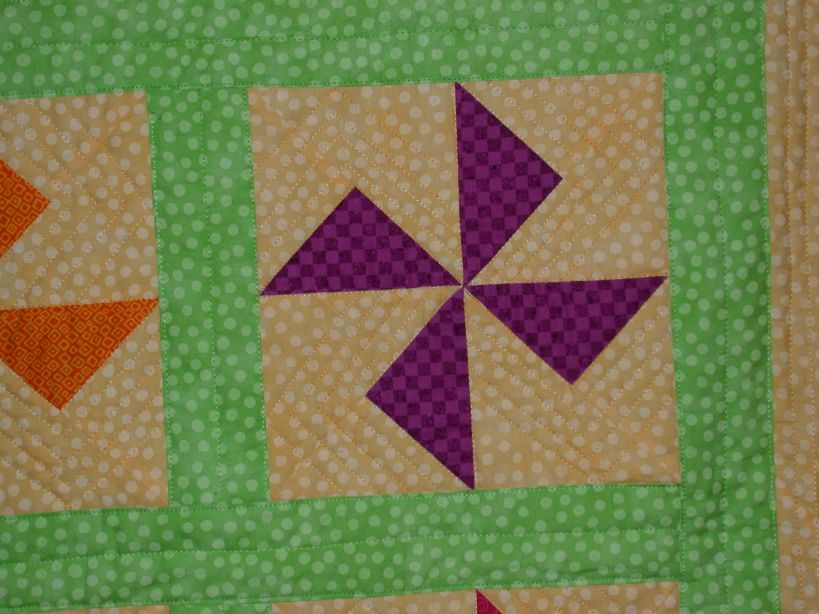
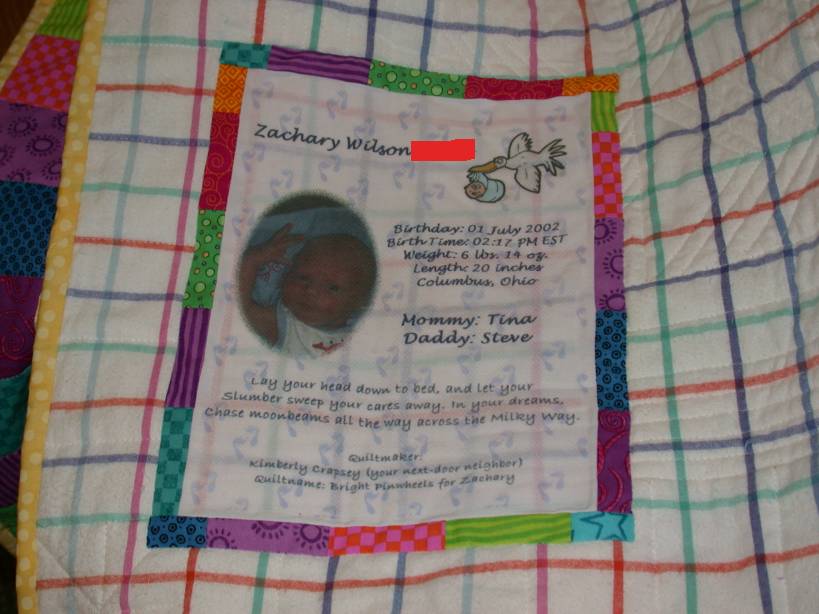 | This was made for my newest neighbor born on July 1st. :-) His mommy picked out the pattern, before she knew
he was a "he", from the Nancy Smith and Lynda Milligan book PS I Love You, Two. I had to modify the pattern,
basically just make it up from scratch, because the pattern in the book called for 3 dimensional pinwheels. I
didn't think it would be a good idea to have a "cuddle and drag" quilt with lots of crevices to hold stuff, ya know?
I also changed the border as I couldn't figure out how to do the "flying geese-esque" border that they showed in the book. So, I just strip pieced some of the left over fabrics together. Each pinwheel is a different fabric, with Moda Dots for the yellow and green. I had bought 1/2 yard of each fabric and have tons left over. Of course, the LQS would get the Moda stars in AFTER I started this! The backing is a moda flannel, found on clearance table, the best kind. I quilted it with Sulky variegated greens and yellows. I like the sheen of that thread. The pinwheels are outlined quilted and the green and yellow just channel quilted. Unfortunately, as someone at work pointed out, the quilting forms a swastika (sp?) on the backing, but, oh well, the true meaning of that is pride in race, so I guess I won't be concerned about it. I hadn't even noticed that, and I hope nobody else does either! Zachary's mom was so thrilled with it and loves to show it off. I made her promise to let Zachy drag that baby around and she is still in awe of that. She says that she loves showing it off everywhere she goes. Oh yeah, I made the pinwheels using a double HST method, the various other attempts I made didn't work. I have lots of wasted attempts around here. :-( |
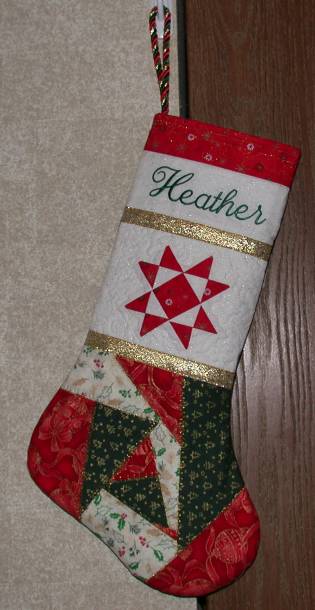 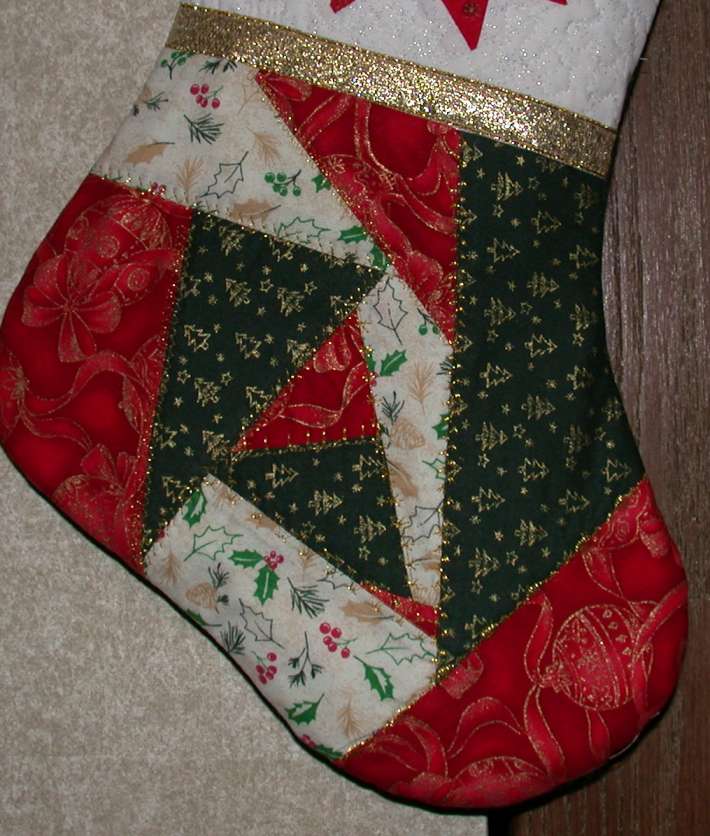 |
I made about 5 of these Christmas Stockings this year. (2002) I did the first two with that ribbon, and then the others I made
piping on my machine and did piping where the ribbon is currently. The bottom portion was assembled using a machine crazy-quilt style.
I had no clue what I was really doing at first, but it all came together wonderfully. I then used all of the decorative stitches on my
Viking Lily 555 to do the quilting on the bottom portion, where the rest of the stocking was stiple quilted. The back is also quilted,
and the stockings are lined in satin. I figured out the correct way to do that on the second stocking. The embroidery was done by my best friend on her Bernina Artista 180E. I have no idea what I would do without her. :-) The center stars are Ohio Stars set on point. I will eventually be taking photos of an assembly and sharing the pattern on my web site. (I had scoured the net and not found a free quilted stocking pattern so I had to figure it out on my own.) |
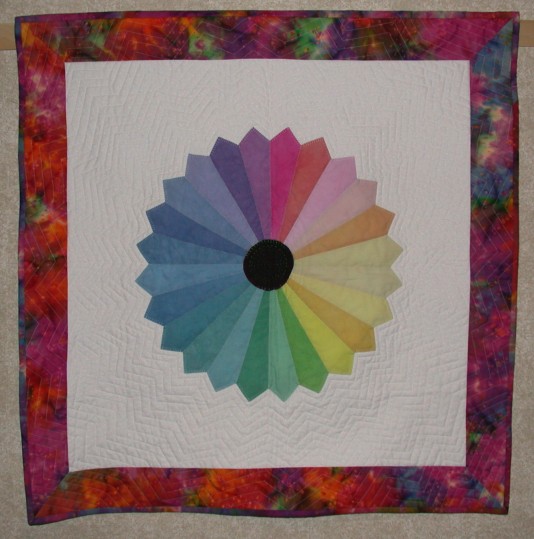 |
I came up with this idea when I was wanting to make a 24 step gradation of hand dyes. The center fan is all of my hand dyes, with a Moda Marble black center, hand quilted in a primary variegated YLI thread, and the outside border a Bali hand dye. The quilting took FOREVER, but I am thrilled with the results. I think I made the background maybe a bit too big, but it works. The pattern is available: http://www.quiltpox.com/Patterns/Colorwheel/. |
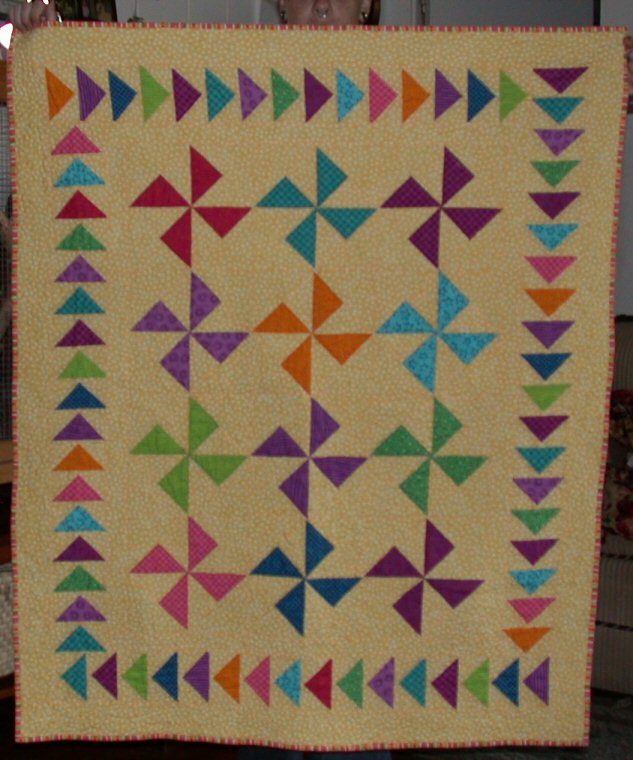 |
Here is a variation of the pinwheel quilt I did above for Zach. This one was made for my great-nephew Nathanial. The actual pinwheel blocks are mirror images of the blocks from Zachary's quilt. (The method of which I created them made two blocks each, one mirror image of the other.) I added yellow borders and with all of my left over pieces of pinwheel blocks, created the flying geese pattern in the border. I did the 4-flying-geese out of one type of assembly. I wouldn't necessary recommend it though because I found it very difficult to have each block come out the right size. |
 |
As is normally the case with me, there is a story behind this quilt. I happened upon this wallhanging kit at Nancy's Notions a while back. Well, I am not
one for buying kits, but I absolutely loved it. And, it would look wonderful in my bedroom, cheaper than the 150$ tapestry I was considering.
Well, I finally decided, after several months, to order it. But, when I went to the website again, the purple looked decidedly blue to me. I wasn't going to take a chance on that, LOL. But, they didn't sell the pattern alone. So, I printed out the picture, turned out to be about 4" square, and drafted it myself at 28" square. I then emailed them to ask for permission to include it in my gallery, and they said sure! :-) So, I did this with the fast stained-glass technique I learned from Christmas with a Tradition while back. I copied the pattern onto fusible interfacing. I had to actually sew two pieces together to be wide enough. I then used freezer paper to copy and cut out each individual piece, and fused them to the interfacing. (I realized LATER that I *could* have done the leaves in one piece! Oy!) Then all I had to do was add the bias, sandwich, quilt. Sounds easy eh? Well, I took this as an opportunity to try that new Dritz fusible bias. Never again! The stuff is horrible! What I like about it over the Clover is that the black is matt, and doesn't shine after ironing like the clover. But, it just didn't stick! They didn't even tell you how long to press on the package. So, I would have to keep going over pieces. This is not a good thing when the pieces are raw edged and only held down slightly to the interfacing. I finally discovered that if I put a weight, ie my filtered water bottle I keep for the iron, right after I pressed, it would help. And, on the last few pieces, I remembered I had some steam-a-seam 1/4" from when I did the stained glass class on the forum. But, even it was too wide, so the 1/4" bias wasn't quite 1/4". I backed it with a black sateen from Joann's (one of the few nice fabrics they have there) and so it looks like a whole cloth quilt. I individually stitched each bias down, on either side, by machine, VERY slowly, so as to be sure to catch the seams underneath within. |
1 | 2 | 3 | 4 | 5 6
Page last modified:
All graphics and content ?2004,2005 QuiltPox.com & Kimberly Crapsey, unless otherwise noted. See full copyright notice.